
SCOPE Training Manual
Complete user training guide for the SCOPE platform — estimates, change orders, proposals, bid leveling, project closeouts, and reporting.
Introduction to SCOPE
SCOPE (System for Change Orders, Proposals & Estimates) is a cloud-based project management platform built specifically for construction and field service companies. This chapter explains what SCOPE does, how work flows through it, and the key terms you will use every day.
What Is SCOPE?
SCOPE centralizes everything that happens before, during, and after a construction project: estimates, change orders, subcontractor bids, construction documents, project closeouts, and financial reporting — all in one place.
Rather than managing proposals in Word, tracking payments in spreadsheets, and emailing documents manually, SCOPE connects all of these activities so your team works from a single source of truth.
Core Workflow Overview
Work in SCOPE follows a predictable path from first contact to project closeout:
| Stage | What happens | SCOPE module |
|---|---|---|
| 1. Prospect | Add the client as a Company and Contact. | Contacts & Companies |
| 2. Estimate | Create an estimate (E001/26), write scope of work and qualifications, set a price, request a client signature. | Estimates & Proposals |
| 3. Job | Signed estimate auto-converts to a job (J001/26). Manage change orders, track billed/received. | Change Orders |
| 4. Subcontracting | Send RFPs, invite bidders, level bids, award work. | Bid Leveling |
| 5. Documents | Issue RFIs, submittals, equipment releases. | RFIs / Submittals / Releases |
| 6. Closeout | Complete a structured checklist of required deliverables. | Project Closeouts |
| 7. Reporting | Review revenue, pipeline, outstanding balances, year-over-year. | Reports |
Key Terminology
- Estimate
- A pre-job proposal. Numbered
E001/26(E = estimate, number, 2-digit year). Has no job number until converted. - Job
- An active contract. Numbered
J001/26. Created by converting a signed estimate. - CO#0 (Base CO)
- The first and always-present change order on every estimate or job. Represents the original base contract price and scope. Cannot be renumbered.
- Change Order (CO)
- Any modification to the original contract. Numbered sequentially starting at CO#1. Each CO tracks price, scope, billed, and received independently.
- Revision
- A version of a CO after it has been edited post-creation. Revisions are archived; the CO table always shows the latest.
- Allowance
- A job-level budget pool. ALLOWANCE-type COs draw from this pool instead of adding to contract value.
- RFI
- Request for Information — a formal question to the client or architect requiring a documented response.
- Submittal
- A transmittal record documenting materials or shop drawings submitted for review.
- Release
- An equipment release transmittal documenting materials released from a supplier or manufacturer.
- RFP / Bid Leveling Sheet
- A structured document sent to subcontractors requesting priced bids on specific line items. Multiple bids can be compared side-by-side in the leveling matrix.
Getting Started
This chapter walks you through your first login, adding team members, understanding user roles, and navigating the main screens. Company profile and settings are covered in Chapter 11.
Logging In
Your SCOPE administrator will provide you with the app URL, your username, and a temporary password.
- Navigate to the SCOPE URL in any modern browser (Chrome, Edge, Firefox, Safari).
- Enter your Username and Password and click Sign In.
- If logging in for the first time with a temporary password, go to My Profile (user icon, top-right) and update your password immediately.
User Roles & Permissions
Roles determine what each user can see and do. Five built-in roles are available; custom roles can be created for more granular control.
| Role | Description | Can manage users? |
|---|---|---|
| Admin | Full access — all features, settings, and user management. | Yes |
| Manager | Create, edit, and manage all proposals, jobs, and documents. Cannot manage users or settings. | No |
| User | View all records, manage proposals, upload attachments, and sign change orders. Cannot create or edit companies, contacts, or employees. | No |
| Employee | Employee login. Can view and manage estimates and jobs, create/edit records, upload attachments, and sign change orders. | No |
| Contact | Client/contact login. Can view their company's projects and sign change orders. | No |
| Custom | Any combination of the 10 permission keys below. | If granted |
The 10 permission keys for custom roles:
| Permission | What it grants |
|---|---|
| View all records | View all jobs and proposals |
| Create & edit records | Create and edit proposals, jobs, and COs |
| Delete / deactivate records | Soft-delete jobs and COs to the Recycle Bin |
| Upload attachments | Upload files to COs and closeout items |
| Sign change orders | Apply an internal signature to a CO |
| Manage proposals & change orders | Convert estimates, update job status |
| Manage users | Add and edit user accounts |
| Manage roles & titles | Create and edit custom roles and manage title options |
| Restore deleted records | Restore deleted records from the Recycle Bin |
| Manage system settings | Access Settings and Administration pages |
To create a custom role: gear icon → Administration → Roles → Add. Built-in roles (Admin, Manager, User, Employee, Contact) are read-only.
Inviting Your Team Members
Each team member needs a SCOPE user account. Accounts are managed by any user with the manage_users permission (Admin role by default).
- Click the gear icon → Administration → Users.
- Click Add in the toolbar.
- Enter a Username, assign a Role, and set a temporary Password.
- Click Submit and share the credentials with the team member securely.
For advanced user and role management — including creating custom roles — see Chapter 11: Administration & Settings.
Navigating the Dashboard
The dashboard is your financial and activity snapshot. It loads automatically after login and always reflects data for the selected reporting year.
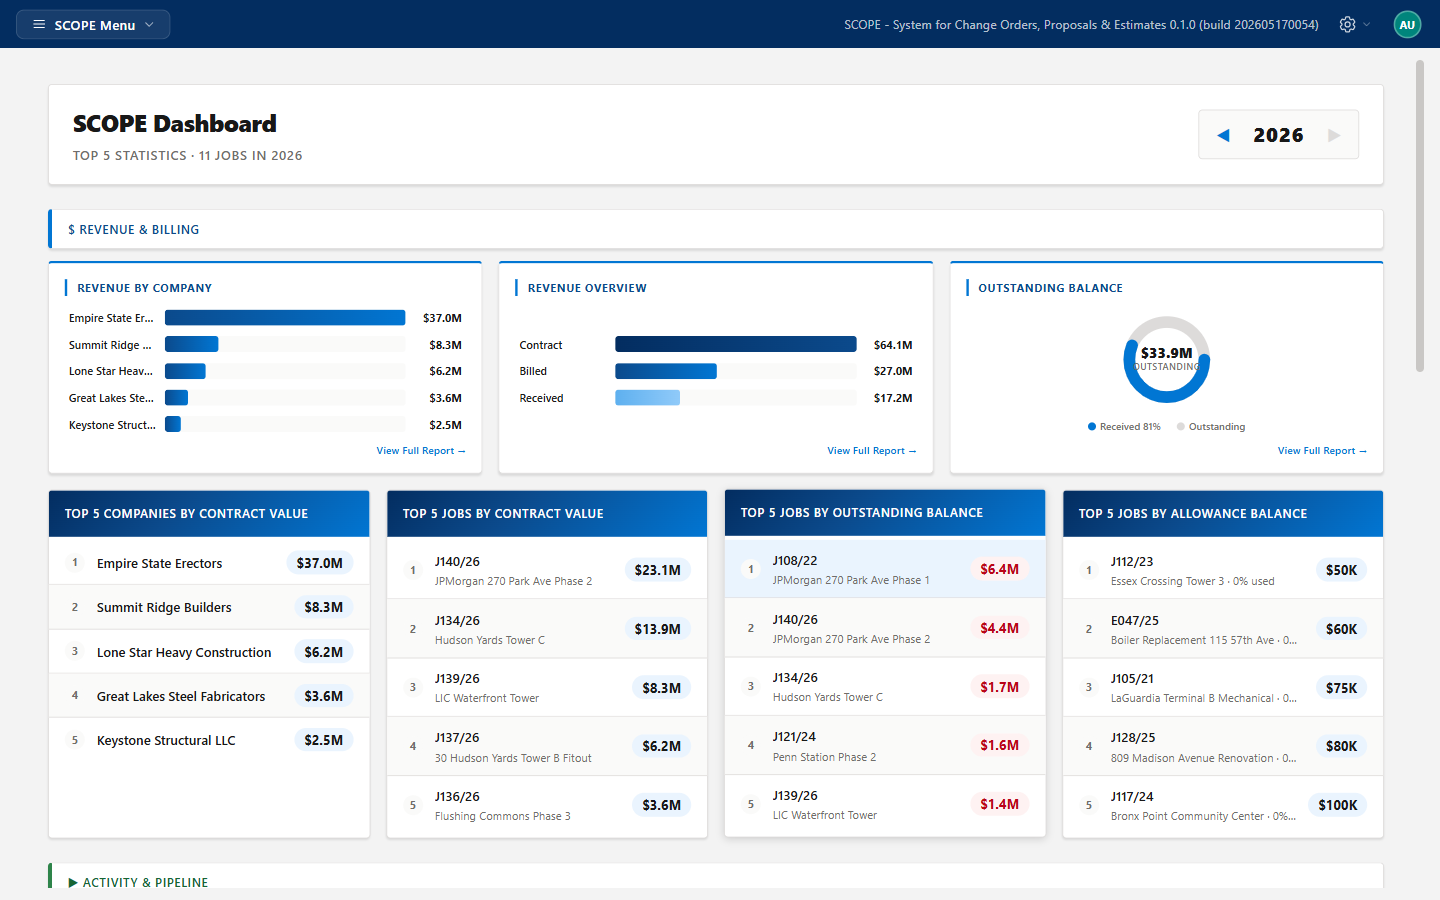
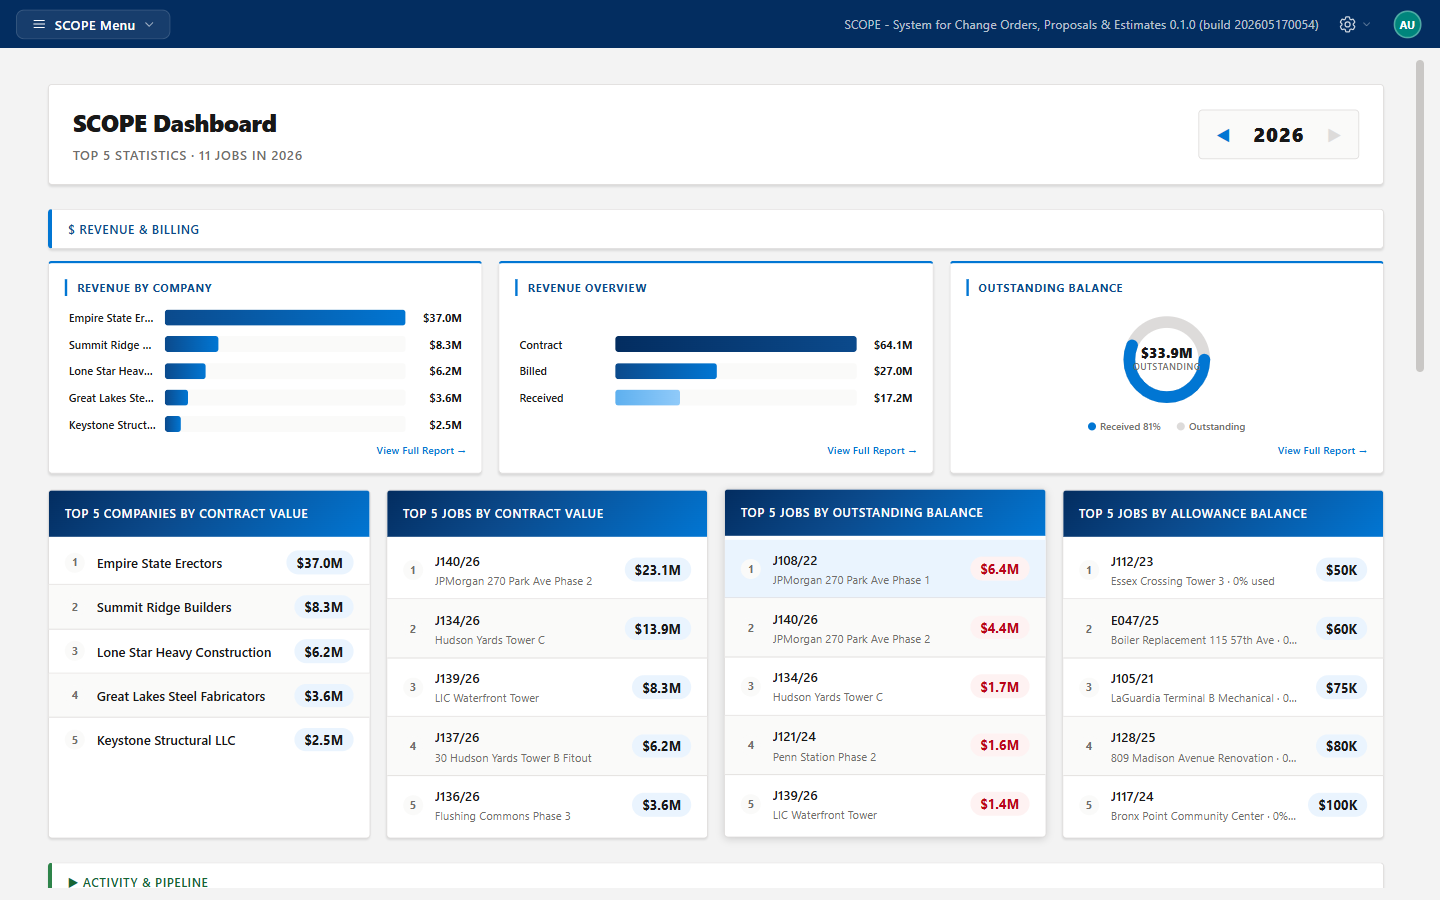
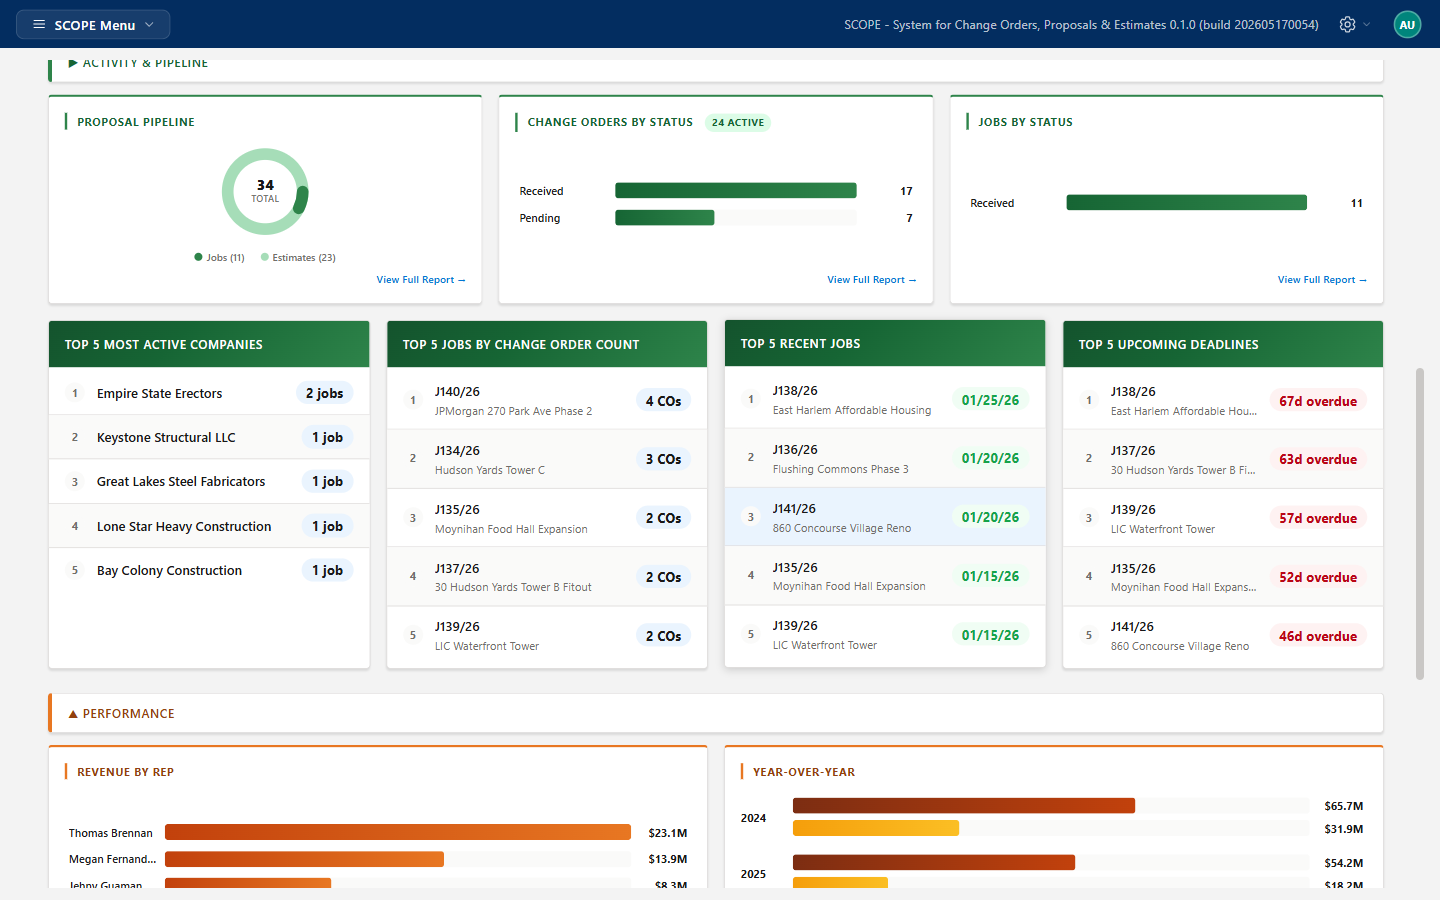
The dashboard is divided into three color-coded sections, each containing charts and Top 5 stat cards:
Revenue & Billing Tracks the financial health of your portfolio — contract value, billed, received, and outstanding balances broken down by company and job.
Activity & Pipeline Shows open proposals, job counts, change order status distribution, recent jobs, and upcoming deadlines.
Performance Highlights revenue by representative, year-over-year contract and billed comparisons, top estimators, and work that has been completed but not yet billed.
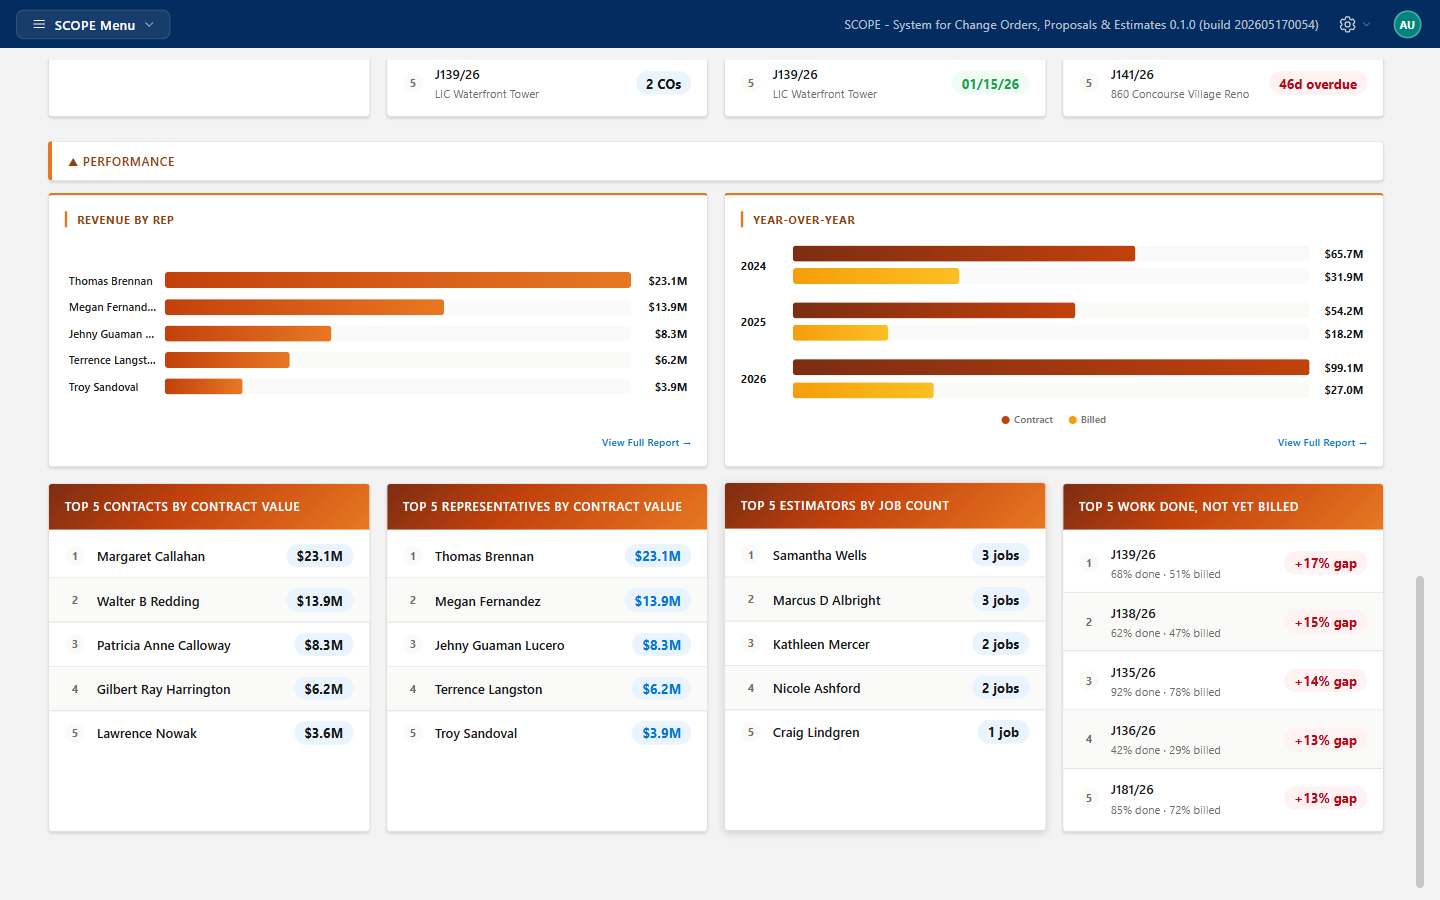
Use the ◄ YEAR ► arrows at the top right of the dashboard to switch reporting years. Click any job row inside a stat card to navigate directly to that job in Proposals.
Main Navigation
Navigation is accessed through the SCOPE Menu button in the top-left corner of the header. Click it to open the main navigation dropdown. All primary sections are listed there — no persistent sidebar is shown.
| Menu Item | What it opens |
|---|---|
| Dashboard | Financial & activity overview |
| Companies | Client and subcontractor companies |
| Contacts | Client and subcontractor contacts |
| Employees | Internal staff / estimator list |
| Estimates | All pre-job proposals (filtered view of Proposals) |
| Jobs | All active jobs and their CO tables |
| Qualifications | Reusable qualification templates |
| Reports | Revenue, pipeline, and financial reports |
| Project Timeline | Gantt-style job timeline |
The ⚙ gear icon in the top-right header opens a separate menu with: Administration (Users, Roles, Titles, Recycle Bin, Audit Log, Closeout Templates), Settings, Subscription, and Help (support ticket submission).
Estimates & Proposals
An estimate captures the full proposal for a project: client, location, price, scope of work, and qualifications. Once signed, it automatically becomes a job.
Creating Your First Estimate
- Click SCOPE Menu (top-left) and select Estimates.
- Click + Add Proposal in the toolbar.
- Fill in the Proposal Header fields (see table below).
- Fill in the CO#0 (base contract) details (see table below).
- Click Submit. The estimate is saved and assigned a number like
E001/26.
Step 3 — Proposal Header Fields
| Field | What it means | Required? |
|---|---|---|
| Job Name | Descriptive title for the project. Appears on all CO letters and reports. | Yes |
| Company | The client company. Type to search your company list. | Yes |
| Contact | The client contact person. Auto-filters to contacts at the selected company. | Yes |
| Job Location | Project site address. Uses Google Places autocomplete — City, State, and ZIP fill in automatically. | No |
| Estimator | The employee responsible for preparing this estimate. Must have the "Estimator" title assigned in their employee record. | Yes |
| Representative | Internal account owner or sales rep for this project. | No |
| Due Date | Proposal expiration or bid submission deadline. | No |
Step 4 — CO#0 Fields (Base Contract)
CO#0 is the original base contract. Every estimate starts with one and it cannot be renumbered.
| Field | What it means | Required? |
|---|---|---|
| Description | One-line summary shown in the CO table and on all reports. | Yes |
| EST (E-ST) | Estimated straight-time labor hours at the standard hourly rate. | No |
| EOT (E-OT) | Estimated overtime labor hours (typically billed at 1.5× the standard rate). | No |
| EPT (E-PT) | Estimated premium/double-time labor hours (typically billed at 2× the standard rate). | No |
| E-Material ($) | Estimated cost of materials for this scope of work. | No |
| Price ($) | Total contract value — the dollar amount the client will be charged. | No |
| CO Status | Approval status of the CO (Draft, Pending, Received, etc.). See CO Status Values below. | No |
| Field Status | On-site execution status (On Hold, Proceed, Complete, Void, Lost). See Field Status Values below. | No |
| Contract # | Client's purchase order or contract reference number, for your records. | No |
| %Completed | Percentage of field work physically completed (0–100). Used for progress tracking. | No |
| Billed ($) | Amount invoiced to the client. Turns green when equal to or greater than Price. | No |
| Received ($) | Amount collected from the client. Turns green when equal to or greater than Billed. | No |
| Comments | Internal notes. Not printed on the CO letter or PDF. | No |
| Scope of Work | Rich-text description of all deliverables. Appears word-for-word on the printed CO, PDF, and emailed version. | No |
| Qualifications | Terms, exclusions, and conditions applicable to this estimate. | No |
Building Out Scope of Work
The Scope of Work uses a full WYSIWYG rich-text editor. What you write here appears word-for-word on the printed CO, PDF, and emailed version — it is the primary client-facing description of the work.
- Use Bold and Italic for emphasis.
- Use bullet lists and numbered lists for itemized scope items.
- Use headings to organize large scopes into sections.
Type directly or paste from Word or other sources — basic formatting is preserved.
Using Qualification Templates
Qualification templates let you insert pre-written terms and exclusions with one click — no retyping.
- In the Qualifications field on any CO form, click List Qualifications.
- The Qualifications Picker opens with your templates grouped by trade type.
- Check individual items or entire templates.
- Click Insert Selected. The text is appended into the field.
To manage your template library:
- Click SCOPE Menu (top-left) and select Qualifications.
- Add, edit, or delete templates and individual items from this page.
- Organize items by trade type so the picker stays easy to navigate as your library grows.
Requesting a Digital Signature from a Client
SCOPE sends your client a secure signing link by email. They can sign without a SCOPE account.
- Open the estimate or job and click the eye (view) icon on the row to open the CO view.
- In the toolbar, click Request Signature.
- SCOPE emails the contact on file a secure tokenized link, valid for 7 days.
- The client opens the link, reviews the CO letter, and signs using either a typed name or a drawn signature.
- Once signed, SCOPE records the signature and auto-converts the estimate to a job.
To sign internally (on behalf of your company): open the CO view and click Sign in the toolbar.
Converting an Estimate to a Job
There are two ways to convert an estimate to a job:
- Automatic: When CO#0 is signed (by client or internally), SCOPE converts and assigns the next job number automatically.
- Manual: Open the estimate detail view, click the green Convert to Job button in the toolbar, and confirm in the dialog that appears.
After conversion, the record appears under the Jobs tab with a number like J001/26. The estimate number is retired.
CO Status Values
| Status | Meaning |
|---|---|
| PENDING | Submitted to client, awaiting approval. |
| RECEIVED | Approved and signed. |
| DRAFT | Not yet sent to client. |
| ENTRY | Back-entered for record-keeping (displays as "Entry" in the UI); not sent externally. |
| ALLOWANCE | Draws from the job allowance pool instead of adding to contract value. |
| VOID | Cancelled CO; excluded from totals. |
| LOST | Rejected by client. |
Field Status Values
Field Status tracks the on-site execution state of each CO, independent of the billing/approval CO Status.
| Status | Meaning |
|---|---|
| On Hold | Work has not started or has been paused. Awaiting direction from the client or field crew. |
| Proceed | Work is authorized and actively in progress in the field. |
| Complete | All field work for this CO is finished. |
| Void | The work was cancelled and will not be performed. |
| Lost | The CO was not awarded; the scope went to another contractor. |
Change Orders
Change orders track every modification to the original contract — price changes, scope additions, and field updates. Each CO lives on a specific job and tracks its own price, billed amount, and received amount.
Adding a Change Order to a Job
- Open a job from the Jobs tab.
- Click Add CO in the toolbar.
- Fill in the CO details:
- Price — the value of this change (can be negative for credits).
- Description — one-line summary shown in the CO table.
- Scope of Work — rich-text detail of the change.
- Qualifications — applicable terms or exclusions.
- E-ST / E-OT — estimated straight-time and overtime labor hours.
- E-Mat — estimated material cost for this change.
- Click Submit. SCOPE assigns the next CO number automatically.
Sending and Emailing a Change Order
- Click the eye icon on the CO row to open the CO view page.
- Click Email in the toolbar.
- The To field auto-fills with the job's contact email. Add CC/BCC if needed.
- Click Send. The email delivers a clean letterhead layout with logo, job details, price, and full scope.
Other output options:
- Print — opens the browser print dialog with formatted letterhead.
- PDF — click the download icon on the CO row in the table to generate and download a PDF.
Inline CO Editing
SCOPE supports Excel-style inline editing of the CO table — useful for quickly updating multiple COs at once.
- Open a job and click Edit in the job toolbar to enter inline editing mode.
- All CO rows become editable. Click any cell to update it directly.
- The % Billed column calculates automatically from Billed ÷ Price.
- Use the ⊜ fill button next to Billed to auto-fill with the CO Price. Use the ⊜ next to Received to auto-fill with the Billed amount.
- Click Submit to save all changes.
Tracking Billed and Received Amounts
For each CO, you track three financial figures: Price (contract value), Billed (amount invoiced), and Received (amount paid).
Color coding in the CO table:
- Billed turns green when ≥ Price (fully billed). Red when below Price.
- Received turns green when ≥ Billed (fully paid). Red when below Billed.
- % Billed and % Received are computed automatically.
Viewing Change Order History and Revisions
The CO table always shows the latest revision of each CO. Older revisions are archived and accessible from the CO view page.
- Click the eye icon on the CO row to open the CO view page.
- Use the Revision dropdown near the top of the page to select a previous revision.
To create a new revision:
- Open the CO view page and click Revise in the toolbar.
- The edit form opens pre-filled with the current data. Make your changes and click Submit.
- A new revision is created (e.g., CO#1 Rev 1). The previous version is archived automatically.
Attaching Files to a Change Order
File attachments (photos, drawings, PDFs) can be added to any CO and managed from the CO view page.
- Open the CO view page and click Attachments in the toolbar.
- Drag and drop files onto the upload zone, or click Browse to select files.
- Each uploaded file appears as a card. Double-click the description to edit it inline.
- To delete a file, click the × remove button on the card. Deleted files go to the Recycle Bin and can be permanently removed from Administration → Recycle Bin.
RFIs, Submittals & Releases
Construction document management is handled through three document types — Requests for Information, Submittal Transmittals, and Equipment Releases. All are accessible from the job detail view.
Accessing Construction Documents
From any Job detail view, use the toolbar buttons to open each panel:
- Click RFIs to manage Requests for Information.
- Click Submittals to manage submittal transmittals.
- Click Releases to manage equipment release documents.
Each panel opens in an overlay on the right side of the screen. Click the same button again to close it.
Creating a Request for Information (RFI)
RFIs document formal questions requiring a response from the architect, engineer, or client.
- Open a job and click RFIs in the toolbar.
- Click Add RFI.
- Fill in the fields:
- Subject — brief description of the question.
- Request Date / Due Date / Days to Reply — deadline tracking fields.
- Cost Impact — YES, NO, or REVIEW.
- Status — OPEN, CLOSED, or VOID.
- Request — the full question in rich text.
- Response — fill in when a response is received.
- Company / Contact / Requested By — the party the RFI is directed to.
- Click Submit. SCOPE auto-assigns the next RFI number for this job.
From the RFI list, overdue RFIs are indicated with a red dot. Closed RFIs show a green dot.
To email an RFI to the contact: open the RFI view page and click Email. The To field auto-fills with the contact's email address.
Managing Submittal Transmittals
Submittals document materials or shop drawings submitted for review.
- Open a job and click Submittals in the toolbar.
- Click + Add Submittal.
- Fill in:
- Subject, Classification, Submit Date, Review Status, Lead Time.
- Sending Info and Reason — multi-value tags for transmission method and reason codes.
- Remarks, Copy To.
- Company / Contact / Submitted By.
- Click Submit. Auto-assigned submittal number for this job.
To create a new revision of a submittal: open the submittal view and click Revise. A new revision is created and the original is soft-deleted.
Submittals can be printed or emailed directly from the view toolbar. Attachments can be added via drag-and-drop.
Creating Equipment Release Documents
Releases document materials or equipment being released from a supplier or manufacturer to the job site.
- Open a job and click Releases in the toolbar.
- Click + Add Release.
- Fill in:
- Release Date, PO Number, Remarks.
- Company and Contact — the supplier or manufacturer.
- Submitted By — internal employee authorizing the release.
- Released checkbox — mark when equipment is physically released.
- Click Submit. Auto-assigned release number for this job.
Duplicate a release to the same job: Options → Duplicate to this job — creates a new release with the next number.
Copy a release to another job: Options → Copy to another job — opens a job picker modal.
Printing and Emailing Construction Documents
RFIs, submittals, and releases all share the same output options from their view toolbar:
| Button | What it does |
|---|---|
| Opens a formatted letterhead print dialog. The tab closes automatically after printing. | |
| Generates and downloads a PDF using the same letterhead layout. | |
| Opens an email dialog pre-filled with the contact's address. Sends the document as a formatted email with CC/BCC options. |
Attachment chips appear above the drop zone in all document panels. Each chip shows the filename on line 1 and a description on line 2. Double-click the description to edit it inline.
Bid Leveling
Bid Leveling lets you collect subcontractor bids on specific line items and compare them side by side in a matrix. You can invite vendors by email, allow public bid submission, award work per row, and export the results.
Creating a Bid Leveling Sheet
- Open a job and click RFPs in the toolbar.
- Click + Add RFP.
- Fill in the header: Trade, Bid Date, Due Date, Status, Remarks.
- Click Submit. The sheet opens automatically in Edit Matrix mode.
- Add line items (rows): enter item descriptions, quantities, and units. Each row becomes a cell in the bid matrix that bidders price individually.
rfpNo). CO#0 covers both the estimating and job phases, so RFPs on CO#0 are visible across the entire project lifecycle.Inviting Bidders and Sending Invitations
- On the leveling sheet, click + Add Bidder and search for a company. Select from the autocomplete dropdown.
- Add contacts for each bidder: search by contact name filtered to the bidder's company. Each contact gets their own invitation email.
- To send invitations, click Invite to Bid. Select which bidders to include and click Send Invitations.
- Each bidder receives a secure tokenized email with a link to the public bid portal — valid until the sheet's due date.
Find vendors by trade classification: Click Find by Trade to search vendors tagged with a specific classification and bulk-add them as bidders.
Comparing and Leveling Bids
Once bids are submitted, the leveling matrix shows all bidders' prices side by side.
- Each column is one bidder. Each row is one scope item.
- The lowest bid per row is highlighted in green automatically.
- Each bidder has 6 adjustment fields: Tax/Overhead, Markup, Sales Tax, Freight, Discount, and Insurance. These shift the bidder's total for apples-to-apples comparison.
- Column subtotals and the grand total update automatically as you enter or adjust values.
To edit bids or adjustments: click any cell in the matrix to enter inline edit mode. Changes are saved automatically with a short debounce.
Awarding Work
- In the leveling matrix, check the Award checkbox on each row to mark which bidder won that line item.
- Split awards are supported — different rows can be awarded to different bidders.
- Awarded rows are highlighted in the Awarded column with green tinting.
Using the Public Bid Submission Portal
Bidders receive a unique link that opens a read-only view of the RFP with their assigned column editable. No SCOPE account is required.
- Bidders enter unit prices for each line item. Extended prices (unit × qty) calculate automatically.
- Bidders can upload attachments directly from the public portal.
- SCOPE records the time the bidder opened the link (
openedAt) for tracking. - Once the due date passes, the link expires and the portal becomes read-only for that bidder.
Managing Bid Reminders and Deadlines
- SCOPE sends automated reminder emails to bidders who have not yet submitted as the due date approaches.
- The bid due date is set in the RFP header. Bidder links expire at this date.
- You can customize the bid invitation email template under gear icon → Settings → Email Templates.
- Available merge tokens in the template:
{{jobName}},{{link}},{{dueDate}}, and others.
Project Closeouts
Project Closeouts give you a structured checklist of deliverables required to close out a completed job — inspections, warranties, as-builts, lien waivers, and more. Checklists are built from templates and tracked per job.
Creating and Managing Closeout Templates
Closeout templates define the standard checklist structure used across your jobs. Build one template per project type (commercial, residential, service, etc.). Templates are accessible two ways: from within a job's Project Closeouts panel, or directly via gear icon → Administration → Closeout Templates.
- Navigate to gear icon → Administration → Closeout Templates, or open any job's Project Closeouts panel and click Manage Templates.
- Click + Add Template, give it a name, and click Submit.
- Add sections to organize your checklist (e.g., "Inspections", "Warranties", "Documents").
- Add items within each section. For each item, set:
- Date Available / Date Required — show the date field; require it for completion.
- Attachment Available / Attachment Required — show the attachment slot; require it for completion.
- Click Save Template.
Using Project Closeouts
- Open a job and click Project Closeouts in the toolbar.
- If no closeout exists yet, select a Closeout Template from the template bar and click Apply. The checklist is instantiated from the template.
- For each checklist item, fill in the available fields: date, status, notes, and any required attachments.
- Click Save Closeout to save progress as a draft.
Tracking Closeout Checklist Items
Each checklist item can be in one of the following states. Items are considered open until their state moves out of this list:
- Pending, In Progress, Submitted, Approved, N/A
Items are considered resolved when their state is Submitted, Approved, or N/A. All three count toward the completion percentage.
The closeout progress bar at the top of the panel reflects the percentage of items in a completed state.
Attaching Files to Closeout Items
Each checklist item that has attachments enabled shows a file drop zone.
- Drag files directly onto the item's drop zone, or click to browse. Multiple files can be uploaded sequentially.
- Each file uploads immediately and appears as a chip above the drop zone.
- Double-click the description line on any chip to edit the description inline.
- A summary toast appears after each upload batch confirming success or any errors.
Completing and Exporting a Closeout
To mark a closeout complete:
- Ensure all Required items (red asterisks) have been filled in.
- Click Complete Closeout. SCOPE validates required fields server-side and records the completion date.
- Once complete, all fields become read-only. The action bar changes to show Reopen Closeout and Close.
To reopen a completed closeout for further edits, click Reopen Closeout. (Save Closeout re-saves it in draft state.)
Export options:
- PDF — click PDF in the toolbar to generate a formatted closeout report.
- Excel — click Export Excel to download a two-sheet workbook (summary + detail).
Reports & Financials
SCOPE includes nine report types covering revenue, pipeline, outstanding balances, job performance, and year-over-year comparisons. All reports are computed from your live job and CO data.
Accessing Reports
Click SCOPE Menu (top-left) and select Reports. The report type is selected from the sub-navigation within the Reports section. All report data is computed client-side from your jobs — no wait for a server query.
Revenue Reports
Three revenue views are available:
| Report | Groups by | Shows |
|---|---|---|
| Revenue by Job | Individual job | Price, Billed, Received per job |
| Revenue by Company | Client company | Totals across all jobs for that company |
| Revenue by Representative | Internal rep | Totals across all jobs assigned to that rep |
Click any job row in a Revenue report to jump directly to that job in Proposals.
Understanding the Pipeline Report
The Proposal Pipeline report shows all active estimates grouped by status (PENDING, DRAFT, etc.) with their total values. Use this to understand how much potential revenue is in your sales funnel and at what stage.
Tracking Outstanding Balances
The Outstanding Balance report shows every job where Received < Billed — i.e., money you have invoiced but not yet collected. Each row includes:
- Job name and number
- Project Manager name and email
- Accounting contact name and email
- Total billed, received, and the outstanding difference
Use this report as your accounts receivable follow-up list.
Running the Change Order Report
The Change Order Report lists every CO across all jobs with its status, price, billed, and received amounts. Filter by CO status to focus on specific subsets (e.g., all PENDING COs).
Jobs by Status Report
The Jobs by Status report groups all jobs by their current CO#0 status (e.g., PENDING, RECEIVED, VOID, LOST). Use this report to get a count and total value of jobs at each stage of the pipeline.
Year-Over-Year Comparison Report
The Year-Over-Year report compares contract value, billed, and received across multiple calendar years side by side. Use the year selector to add or remove years from the comparison.
Viewing the Allowance Report
The Allowance Report shows all jobs with an allowance pool configured. For each job it shows:
- Total allowance pool amount
- Total drawn from allowance (sum of ALLOWANCE-status COs)
- Remaining balance
Jobs where the allowance is fully exhausted or over-drawn are flagged.
Exporting and Printing Reports
All reports support the following export options from the report toolbar:
- Excel Export — downloads the current report as an Excel file.
- Print — formatted print layout for the current report view.
Click any job row in any report to navigate directly to that job in Proposals.
Contacts, Companies & Employees
Contacts are the people you do business with. Companies are the organizations they belong to. Employees are your internal staff. All three are searchable, sortable, and linked to jobs.
Adding a New Contact or Company
Adding a company:
- Click SCOPE Menu (top-left) and select Companies.
- Click + Add in the toolbar.
- Fill in the company name, phone, email, address, and any vendor classification tags.
- If this is a subcontractor vendor, check the Vendor checkbox and add trade classification tags (e.g., "Electrical", "HVAC"). These tags are used in the Bid Leveling "Find by Trade" feature.
- Click Submit.
Adding a contact:
- Click SCOPE Menu (top-left) and select Contacts.
- Click + Add in the toolbar.
- Fill in the contact's name, titles, company association, phone numbers, and email addresses.
- Click Submit.
Linking Contacts to Jobs
Contacts are linked to jobs through the Company and Contact fields on each estimate/job and on each CO. When you select a Company on a CO form, the Contact dropdown automatically filters to only show contacts belonging to that company.
Selecting a Contact auto-fills the Company field if the contact is associated with only one company.
Searching and Filtering Your Contact List
- Use the Search bar at the top of the Contacts or Companies list to filter by name in real time.
- Click column headers to sort the list by that column (ascending / descending).
- Use the ADMIN: List Inactive toggle to show or hide soft-deleted (inactive) records.
- Export the filtered list using the Export dropdown: Excel (.xls), CSV, Tab-Delimited, or PDF.
Viewing a Contact's Full Job History
The contact detail page shows every estimate and job associated with that contact, grouped and filtered to the latest revision per CO.
- Click a contact row to open the detail view.
- Scroll down to the Job History accordion. Expand it to see all associated jobs.
- Each job shows its number, name, CO summary, and total value.
Company detail pages show separate tables for Jobs and Estimates, each sortable by column.
Managing Your Internal Employee List
Employees are internal staff who appear in the Estimator, Representative, and Submitted By fields on proposals and documents.
- Click SCOPE Menu (top-left) and select Employees.
- Click + Add to create a new employee record. Fill in name, title(s), phone, and email.
- To make an employee available as an Estimator on proposals, assign the title "Estimator" in their record.
Job Progress & Tracking
SCOPE gives you real-time visibility into how each job is progressing financially and in the field — from contract value to field status to allowance balance to the project calendar.
Understanding Contract Value, Billed, and Received
Every job has three key financial metrics, shown as horizontal progress bars at the top of the job detail view:
| Metric | Definition |
|---|---|
| Contract Value | Total value of all non-VOID COs (including CO#0). This is the total you are contracted to perform. |
| Billed | Total amount invoiced to the client across all COs. Updated manually by your team. |
| Received | Total amount paid by the client. Updated manually by your team. |
The three status bar charts across the top of the job detail view show CO Status, Field Status, and Allowance Status as visual progress bars — giving you an at-a-glance reading of job health.
Tracking Job Progress with % Complete
Each CO has a % Complete field (labeled % Bld in the CO table) that represents field progress. Update this regularly to keep your job status charts accurate.
- Open a job and click Edit to enter inline editing mode.
- Update the % Complete column for each CO row.
- Click Submit to save.
Using Job Allowances
An allowance is a predefined budget pool for work that cannot be fully scoped in advance. Instead of adding to the contract value, ALLOWANCE-status COs draw from this pool.
Setting up an allowance:
- Open the job detail view and click Edit Job Details (pencil icon next to the job header).
- Enter the Allowance amount and click Save.
Using the allowance:
- When adding or editing a CO, set its Status to ALLOWANCE.
- SCOPE validates that the total of all ALLOWANCE COs does not exceed the allowance pool.
- The Allowance Status bar on the job header shows how much of the pool has been drawn.
- ALLOWANCE COs display in the table with the prefix
A{number}instead ofC{number}.
Using the Project Timeline View
The Project Timeline (accessible from the SCOPE Menu) displays all jobs as horizontal bars spanning their CO date ranges across monthly columns — a Gantt-style project timeline.
- Use the ◄ YEAR ► arrows to change the display year.
- Each job bar spans from its earliest CO date to its latest.
- Hover over a bar to see the job name and date range.
Use the Project Timeline for scheduling visibility — to see which months are heavily loaded and where there is capacity for new work.
Administration & Settings
The Settings and Administration pages are accessible from the gear icon in the top-right corner. Admin users can configure company branding, email delivery, user accounts, and review the full system audit log.
Setting Up Your Company Profile & Settings
Your company profile provides the name, address, and logo that appear on every printed and emailed change order. Complete this before creating any proposals.
- Click the gear icon (top-right) and select Settings.
- Expand the Company Info accordion and fill in:
- Company Name, Address, Phone, Email
- Click Save.
- To add your logo, click Upload Logo. Click to browse and select an image.
- For JPG/PNG: a crop tool appears — adjust to the 3.5:1 frame and click Crop & Save.
- For SVG: saved immediately without cropping.
All settings are organized in expandable accordion cards. Click Expand All to open everything at once. The full list of configurable sections:
| Settings Section | What you configure |
|---|---|
| Company Information | Company name, address, phone, and email — appears on all CO letterheads. Also upload or replace your company logo (JPG/PNG opens a crop tool; SVG saves immediately). |
| Invoice Settings | Default payment terms and late fee language printed on invoiced COs. |
| Email Settings | SMTP credentials (host, port, username, password, sender name, sender email, encryption). Required for CO delivery, signatures, and bid invitations. Use the Send Test Email button to verify. |
| Email Templates | Customize the bid invitation email sent to vendors. Supports merge tokens such as {{jobName}} and {{link}}. Includes a live preview and reset-to-default option. |
| Change Order Edit Locking | Real-time WebSocket locking — prevents two users from editing the same CO simultaneously. Locks expire automatically after 60 seconds of inactivity. |
| E-Signature | Admin-only. SCOPE includes a built-in E-SIGN workflow for COs, RFIs, Submittals, and Releases. Clients receive a secure signing link by email and can sign via typed name or drawn signature without a SCOPE account. Each signature captures a timestamp, IP address, and cryptographic hash for a tamper-evident audit trail compliant with the ESIGN Act. |
| Tenant Branding | Admin-only. Primary and accent color pickers with hex input and live preview. Color changes apply to all users immediately — no redeploy required. |
| Feature Flags | Admin-only. Enable or disable specific features for your account. |
Setting Up SMTP Email Configuration
SCOPE sends emails (CO delivery, signatures, bid invitations) through your own email account via SMTP. This gives you full control over the from-address and ensures deliverability.
- Go to gear icon → Settings → Email Settings.
- Fill in:
- SMTP Host — e.g.,
smtp.gmail.comorsmtp.office365.com - SMTP Port —
587for TLS (recommended) or465for SSL - Username — your full email address
- Password — your email account password or app-specific password
- Sender Name — display name recipients see (e.g., "Acme Electrical")
- Sender Email — the From address
- Encryption — TLS or SSL, matching your port
- SMTP Host — e.g.,
- Click Save, then click Send Test Email to verify delivery.
Managing Users and Roles
Users: gear icon → Administration → Users
- Add user: Click Add → enter username, password, and role → Submit.
- Change role: Click the user row → Edit → change Role dropdown → Save.
- Disable user: Change their password to something unknown, or delete the account. There is no suspend function.
Roles: gear icon → Administration → Roles
- The five built-in roles (Admin, Manager, User, Employee, Contact) are read-only.
- Create custom roles by clicking Add, naming the role, and checking the desired permission keys.
- Custom roles take effect immediately — users already logged in will have their permissions updated on their next action.
Managing Contact & Employee Titles
SCOPE lets you customize the available title options for contacts and employees. These options are shared across your account and appear as dropdown choices when creating or editing records.
- Contact Titles: gear icon → Administration → Contact Titles. Add or remove title options shown in the Contact title field (e.g., "Project Manager", "Owner", "GC Rep", "Superintendent").
- Employee Titles: gear icon → Administration → Employee Titles. Add or remove title options for employees (e.g., "Estimator", "Project Manager", "Superintendent"). The Estimator title is required for an employee to appear in the Estimator dropdown on proposals.
Adding or Removing Users
User seat counts affect billing on plans with per-seat pricing. Add and remove users from gear icon → Administration → Users. Your Subscription page reflects the current seat count and how it maps to your plan.
Viewing the Audit Log
The Audit Log records every significant action taken in SCOPE, including who did it and when.
Navigate to gear icon → Administration → Audit Log.
Tracked action types:
| Action | Triggered when |
|---|---|
CREATE | A record (job, CO, contact, etc.) is created |
UPDATE | A record is edited |
DELETE | A record is soft-deleted |
RESTORE | A record is restored from the Recycle Bin |
SIGN | A CO is signed internally |
HARD_DELETE | An attachment is permanently deleted |
PASSWORD_RESET | A user's password is changed |
UNLOCK | A locked user account is unlocked |
LOGIN | A user logs in |
Use the Action Type filter to narrow the log to a specific event type. Each entry shows the timestamp, the user who performed the action, and which record was affected.
Using the Recycle Bin
Deleting a record in SCOPE is a soft delete — the record is marked inactive and moved to the Recycle Bin, not permanently removed. This gives you a safety net.
Navigate to gear icon → Administration → Recycle Bin.
- Restore a job — click Restore on the job row. The job returns to its previous state and is visible in the sidebar again.
- Restore an attachment — click Restore to re-attach the file to its parent record.
- Permanently delete an attachment — click Delete (red trash icon). This action is irreversible — the file is removed from storage permanently.
Support Tickets & Account
Submit support requests directly from within SCOPE, attach relevant files, and manage your account plan and billing from the Subscription page.
Submitting a Support Ticket
Help is accessed from the gear icon in the top-right header — it is not in the main sidebar.
- Click the gear icon (top-right) and select Help.
- Fill in:
- Subject — a brief description of the issue.
- Message — detailed explanation of the problem, including steps to reproduce it if possible.
- Click Submit Ticket. SCOPE saves the ticket and forwards it to the support team immediately.
After submission, SCOPE displays a confirmation screen. If the ticket was received by the support system, you will see "Ticket Submitted & Received". If there was a temporary sync issue, you will see "Ticket Submitted" — the ticket will be delivered automatically within a few minutes.
Attaching Files and Screenshots to a Ticket
Attachments are the best way to help the support team understand and reproduce your issue quickly.
- On the ticket form, drag and drop files onto the attachment drop zone, or click to browse.
- You can also paste files directly from your clipboard: press Ctrl+V anywhere on the form, or right-click the drop zone and select Paste.
- Supported file types: PDF, DOC, DOCX, XLS, XLSX, JPG, PNG, SVG, WebP, GIF, BMP, TIF/TIFF.
Checking Your Ticket Status
After submitting a ticket, the support team will follow up via email. Ticket status updates are communicated through the support system — check your inbox for replies from the Solution Monsters support address.
If you do not receive a confirmation within 30 minutes, check your spam folder or resubmit the ticket.
Updating Your Billing Information
- Click the gear icon (top-right) and select Subscription.
- The Subscription page shows your current plan, usage, and billing period.
- To add or update a card on file, click Add Payment Method (or Update Payment Method if one is already saved). You are redirected to a Stripe-hosted page — card details never pass through SCOPE servers.
- To manage invoices, billing history, or payment addresses, click Manage Billing. This requires a saved payment method and opens the Stripe billing portal.
Upgrading or Changing Your Plan
Admin users can change the subscription plan and billing cycle directly from the Subscription page — no need to contact Solution Monsters.
- Go to Subscription via the gear icon (top-right).
- Scroll to the Change Plan card (visible to Admins with a linked MIQ account).
- Select a billing cycle: Monthly or Annual (Annual gives you 2 months free).
- Select a plan tier from the grid:
- Starter — up to 3 users
- Growth — up to 7 users
- Pro — up to 15 users
- Business — up to 50 users
- Enterprise — unlimited users; custom pricing, provisioned by Solution Monsters (not available in the self-serve plan picker)
- Click Change Plan. The change takes effect immediately.
Cancelling Your Subscription
Cancellations cannot be processed from within the SCOPE app. Contact Solution Monsters directly to cancel:
- Submit a support ticket from within SCOPE (Help via the gear icon, top-right).
- Or visit solutionmonsters.com for contact information.
After cancellation, your account enters a 7-day read-only grace period. During this time you can view records and export data but cannot create or edit records. After the grace period, access is suspended and your data is retained for 90 days.
Common Tasks at a Glance
Bookmark this section for day-to-day reference.
| I want to… | Go to… |
|---|---|
| Create a new estimate | Estimates → + Add Proposal |
| Send a CO to a client | Jobs → eye icon on CO → Email |
| Request a client signature | CO view page → Request Signature |
| Update billed / received | Jobs → Edit → update CO rows → Submit |
| Add a change order | Jobs → Add CO |
| Send an RFP to bidders | Jobs → RFPs → leveling sheet → Invite to Bid |
| File an RFI | Jobs → RFIs → + Add RFI |
| Close out a project | Jobs → Project Closeouts → Complete Closeout |
| Check outstanding balances | Reports → Outstanding Balance |
| Add a user | Gear → Administration → Users → Add |
| Restore a deleted record | Gear → Administration → Recycle Bin → Restore |
| Set up email (SMTP) | Gear → Settings → Email Settings |
| Submit a support ticket | Gear icon → Help |